Copy Track Roland VS880 DAW
Copy a track on the Roland VSS80 recorder.
1. You can use Track Copy with the tracks that are currently audible. Select the V-track that contains the copy source playback data, and prepare that data for playback.
2. Press [TRACK] several times until “TRK Track Copy ?” appears in the display.
3. Press [YES].
4. Press CURSOR [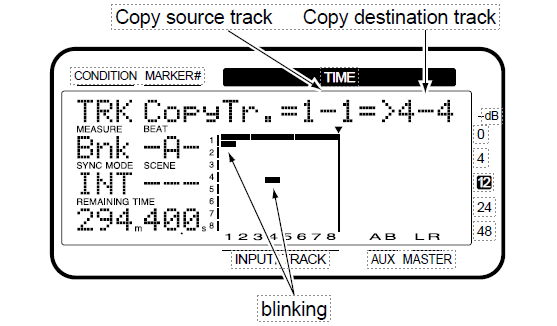 ] several times until “TRK CopyTr.=?-?=>?-?” appears in the display.
5. Press [SELECT (CH EDIT)] for the copy source track.
The SELECT indicator will light orange.
You can also use the TIME/VALUE dial to select the copy source track.
6. Press [STATUS] for the copy destination track. The STATUS indicator will light red.
7. Rotating the TIME/VALUE dial allows you to specify the copy destination V-track. For example, “1-1” indicates “Track 1, V-track 1.”
f you want to copy multiple tracks simultaneously, repeat Steps 5–7.
*Do not designate V-tracks that have already been specified as copy destinations for other Tracks.
9. If there are any tracks which you decide not to copy, press that track’s [SELECT (CH EDIT)] once again.
The SELECT indicator will blink orange. Alternatively, you can use PARAMETER ![]()
![]() to access the settings for that track, and press [CANCEL (NO)] twice.
to access the settings for that track, and press [CANCEL (NO)] twice.
10. Press PARAMETER![]() several times until “TRK St=” appears in the display.
several times until “TRK St=” appears in the display.
11. Rotate the TIME/VALUE dial.
St (Start point)
Specifies the starting time of the copy range.
12. Press PARAMETER [![]() .
.
“TRK Frm=” appears in the display.
13. Rotate the TIME/VALUE dial.
Frm (From point)
Specifies the time of the copy source playback data in relation to the “To” point. Normally you will set this to be the same as the Start point.
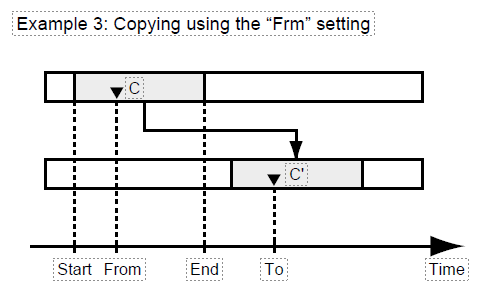
Using “Frm” Effectively
Normally, the data is copied starting at the speci-fied copy destination time.
However, if you want to have the copy made with reference to a point within the designated range where a specific sound occurs, set this with “Frm.”
For example, suppose that you wish to copy a sound effect of a time bomb ticking and then exploding, and that you want to place the explosion at a specific timing location.
Normally, in order to specify the copy destination time, you would have to calculate the time until the explosion occurs.
In such cases, however, you can specify “Frm” as “the copy source time at which the explosion begins” and “TO” (the reference time of the copy destination) as “the copy destination time at which you want the explosion to occur.” This lets you copy the data with the explosion placed with precisely the right timing.
14. Press PARAMETER ![]() . “TRK End=” appears in the display.
. “TRK End=” appears in the display.
15. Rotate the TIME/VALUE dial End (End point)
Specifies the ending time of the copy range.
16. Press PARAMETER ![]() . “TRK To =” appears in the display.
. “TRK To =” appears in the display.
17. Rotate the TIME/VALUE dial. To (To point)
Specifies the reference time of the copy destination.
18. Press PARAMETER ![]() “TRK Copy Time=” appears in the display.
“TRK Copy Time=” appears in the display.
19. Rotate the TIME/VALUE dial.
Copy Time
This specifies the number of times (1–99) the data is to be copied.
20. Press PARAMETER ![]() . “TRK Track Copy OK ?” appears in the display.
. “TRK Track Copy OK ?” appears in the display.
21. Press [YES].
This executes Track Copy. If you wish to cancel, press [NO].
22. When the copy is completed correctly, “Complete” appears in the display, and return to Play condition.
An Easy Way to Specify the Time Settings
Times for the “St,” “Frm,” “End,” and “To” can be specified directly without having to display the Track Copy page. In Play condition, use the fol-lowing procedure.
1. Move to the beginning (“St”) of the copy source performance data.
2. Hold down [TRACK] and press [LOC1/5].
3. Move to the time location in the destination to which the performance data will be copied (“Frm”).
4. Hold down [TRACK] and press [LOC2/6].
5. Move to the end location of the copy source performance data (“End”).
6. Hold down [TRACK] and press [LOC3/7].
7. Move to the basic time of the copy destination (“To”).
8. Hold down [TRACK] and press [LOC4/8]. If you now access the Track Copy page, the times that were specified in steps 1–8 will be input as the time settings for the respective points.